AbdulTech
  • Home
  • Business
    • Internet
    • Market
    • Stock
  • Downloads
    • Dvd
    • Games
    • Software
      • Office
  • Parent Category
    • Child Category 1
      • Sub Child Category 1
      • Sub Child Category 2
      • Sub Child Category 3
    • Child Category 2
    • Child Category 3
    • Child Category 4
  • Featured
  • Health
    • Childcare
    • Doctors
  • Uncategorized
Showing posts with label How To. Show all posts

Tuesday, 5 June 2018

How To Know If Your Phone Battery Is Weak, And Need A Replacement

 Abdul     June 05, 2018     How To     No comments   

They are many way's that you can know that your phone battery is weak and it may need a replacement. Here are some signs;
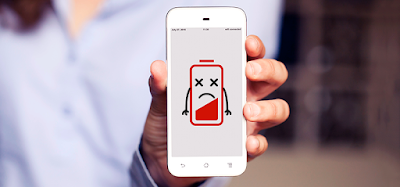

Weak Phone Battery

1. Quick Battery Draining 

The first sign you would get when your battery is becoming weak is quick battery drainage. If you used to get 4 to 6 hours of battery life on heavy usage on your phone, you won’t get those hours of usage anymore. In fact, you might barely get up to an hour under same condition of usage.


2. Charging Becomes Very Fast 

Another sign that shows your battery needs replacement or is becoming weak, is the unusual very fast way it will start charging up to 100% of full power. For example, If you used to get 100% battery charge under 3 hours, you might start getting it under 4 minutes.


3. Inability To Retain Power

This issue normally happen at a very low battery level. That moment you power on your phone and suddenly, it shutdown and you power it on again, only to see it still has some power left. It keeps shutting down due to the issue of not able to retain power.

Read Also:- How To Get Android O Notification Bar On Any Android Smartphone
In conclusion, if you are experiencing these issues, kindly know that your phone’s battery is showing obvious signs of replacement. Additionally, get a good battery from the manufacturer or any verified offline shops and a good charger.

Read More
  • Share This:  
  •  Facebook
  •  Twitter
  •  Google+
  •  Stumble
  •  Digg

Thursday, 4 May 2017

How to Improve Video Game Graphics On Your Android phone Using MultiSample Anti-aliasing

 Abdul     May 04, 2017     android, How To     No comments   

Are you a game freak? You can now improve your game graphics using MultiSample Anti-aliasing. Many people loves HD (high definition) quality games but there are many games that looks blur or have nasty little jagged around the edges which is not good at all. With this tutorial, you will be able to improve the graphics of your Android video game to be more silky smooth and clean.
Video Game
This process consumes battery life faster because it needs to deal with your GPU (graphic processing unit) before it could run this trick for you. If you have a good smartphone with good processor, you are good to go. So, let’s go on!

How To Improve Your Android Game Graphics With MultiSample Anti-aliasing 
  • Firstly, go to “Settings“.
  • Then, tap on “Developer options” (If you don’t have developer option, just go to About phone and tap on BUILD NUMBER seven times).
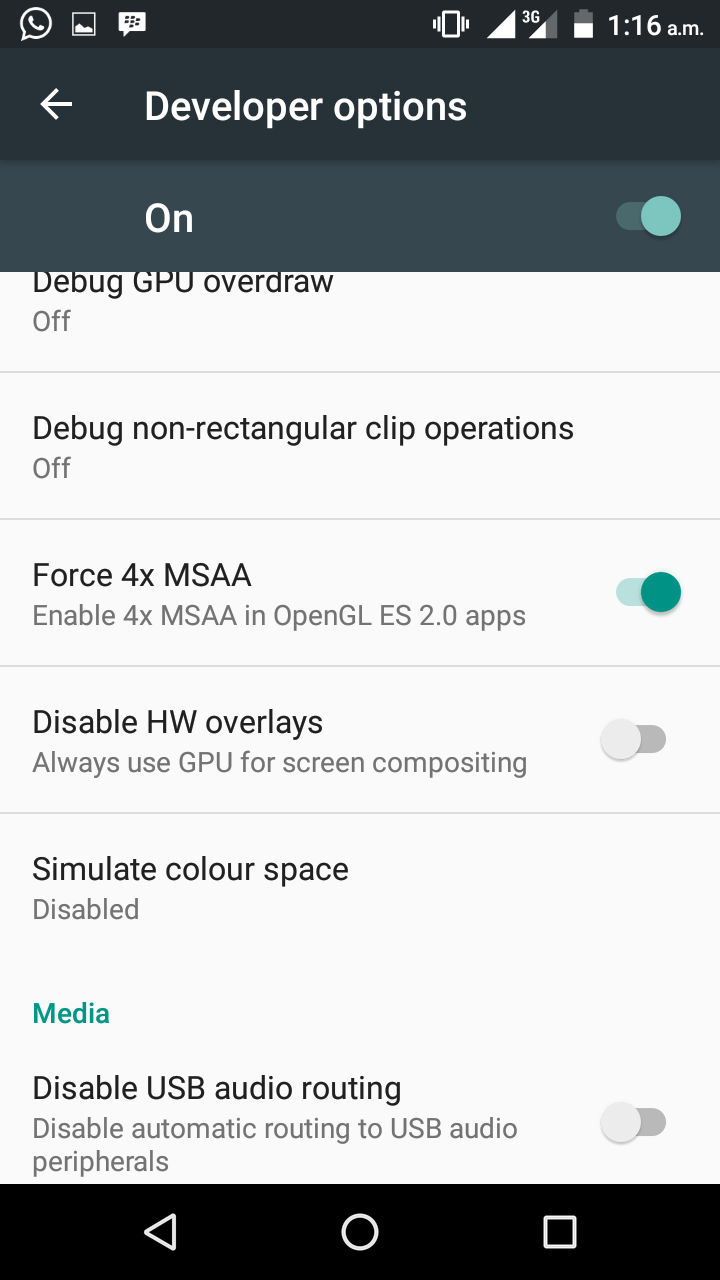
  • In the developer option, locate “Force 4x MSAA” and toggle it to turn on.
Now, your game would be more smooth around the edges with quality graphic. If the game continue to crash, you should go back to developer options and untoggle the Force 4x MSAA to off.
Meanwhile, Force 4x MSAA means MultiSample Anti-aliasing, if you are confused and it doesn’t harm phone.

Is it helpful? Do you encounter any problems or issues while trying to improve your game graphics? Kindly ask more questions and if it works for you, kindly share your experience!
Read More
  • Share This:  
  •  Facebook
  •  Twitter
  •  Google+
  •  Stumble
  •  Digg

Tuesday, 2 May 2017

How To Pin a Chat On WhatsApp

 Abdul     May 02, 2017     How To, whatsapp     No comments   

How To Pin a Chat On WhatsApp
How to pin a chat

The truth is WhatsApp keeps getting better by the day. The latest feature to grace the world’s most popular IM app is the addition of features that allows you Pin up to 3 chats to the top just as we have in some online forums.
The ability to Pin chats on whatsapp will be a great aspect of the social app especially for those of us that have numerous number of conversations from so many people. Things can get clustered thereby making it a bit hard or time consuming to search for your favorite chats but with this latest update, you can simply Pin your favorite chats at the top.
However, this new feature is only available on theWhatsApp beta version 2.17.162(and now 163). In other words, you won’t be able to access it on the regular whatsapp application as of the time of writing this post except you are using WhatsApp Beta.

HOW TO PIN A CHAT
  • Download latest WhatsApp beta 2.17.163
  • Install it on your Android device and run it
  • Tap and hold on any chat and you’ll get a new pin icon in the action bar next to the delete, mute, and archive functions.

For now, only 3 chats can be pinned after you which get a small toast notification message saying you can’t pin more.
We hope it becomes available on the regular app sooner than expected.
Read More
  • Share This:  
  •  Facebook
  •  Twitter
  •  Google+
  •  Stumble
  •  Digg

How To Extend Premium Software Trial Period To Forever For Free!

 Abdul     May 02, 2017     How To     No comments   

How To Extend Premium Software Trial Period To Forever For Free!

Have you ever tried out what turns out to be a pretty cool system app and after the trial period you had to let go because of funds?
Have you ever wondered if you could just use a trial app for like…forever?
I have!
Most of the time I feel like my Antivirus trial app could just go on and on and on…till forever.
So, I did a research and came up with a solution that I am going to share because it works!! ðŸ˜‰
run as date
We are going to employ the services of a PC tool i.e RunAsDate
With “RunAsDate” app, You get to enjoy trial period of premium softwares for life!
And yeah, FREE!!! ðŸ†“
Sounds pretty cool, yeah?
So, let’s dive into the technicalities, just follow the steps below:
> Download the needed tool “RunAsDate”
DOWNLOAD IT HERE
> After downloading RunAsDate tool, Install it on your PC ðŸ’»
> After Installation, proceed to run that premium trial software you wish to enjoy.
Take note of the time of installation (Important)
> As soon as the given trial period lapses and you still want to continue enjoying the premium app ( — this is where “RunAsDate” tool comes in)
Instead on launching the premium trial app directly, you instead right click and select the “run as” option
> From the drop down menu, select “RunAsDate”
> Voila!!! You keep enjoying your premium app after trial period expiry date!
RunAsDate tool works by injecting the trial date into your premium software, thus giving you access to the software for as long as you wish to make use of it.
NB: Be sure to always use the “run as” option instead of direct launching of the intended premium app to continue enjoying it after trial expiry date.
Hope you have found this piece helpful.
Anything to say or ask? Use the comments box
Do not enjoy this alone, kindly share with friends and colleagues using the share button ðŸ”²
Read More
  • Share This:  
  •  Facebook
  •  Twitter
  •  Google+
  •  Stumble
  •  Digg

What To Do If You Forget Your Android Phone Lock Pattern

 Abdul     May 02, 2017     android, How To     No comments   

What To Do If You Forget Your Android Phone Lock Pattern

There are several options available on Android for preventing others from accessing your device.
One of the most known options is the lock pattern, which is a great invention and solely exclusive to Android. Instead of typing in a four digit number or password you can simply draw a pattern.

It’s an extremely handy way to put a layer of security on your device. Furthermore, unlike a pin code or password it can be forgotten easily. How do you go about it then?
To begin with, before you set up any type of security you should make sure your device is set up to be recovered easily. This way if someone steals your device, or you have to wipe it because you forgot your password, it will be easy to get everything back. To do this go to Settings >>Backup & reset and make sure the function is enabled.

What to Do if You Forget Your Android Lock Pattern

After drawing the incorrect pattern for five times, you will be locked out of your device and requested to sign in with your Google account. Click sign in with Gmail account and follow the instructions below:
  1. Input your Gmail username and password.
  2. Click sign in
  3. Click reset pattern option
  4. Draw a new patten.
  5. Confirm the new pattern drawn
With this steps, you have successfully completed the reset option. Use the comment section for further questions.
Read More
  • Share This:  
  •  Facebook
  •  Twitter
  •  Google+
  •  Stumble
  •  Digg

Sunday, 30 April 2017

How To Verify UK, USA And China Adsense Account In Nigeria

 Abdul     April 30, 2017     How To, Web tutorials     2 comments   

Do you own a UK, USA and China Adsense account? Are you trying to verify your foreign Adsense account in Nigeria? Yea! You can do that easily with this tutorial because I will introduce you to a new website that deals with delivery of goods in three (China, UK, and USA) countries. Why I love them is that they deliver the goods right to your doorstep and if the good is in envelope, they can open it and deliver the good as a mail without no obstruction.
One of the must frustrating situation a blogger or vlogger would ever experience is when adsense gives a deadline of adsense verification and this happens when your first earnings reaches a minimum amount of 100$ but when you fail to verify, your adsense will definitely stop showing Ads.
In order for other bloggers facing this issue to also benefits from this, that’s why I had decided to publish an article regarding this issue to help many out there. So, this website that delivers goods is called Shoptomydoor.com. They have an office in Houston USA, UK and China where they deliver any goods from there to other part of the countries.
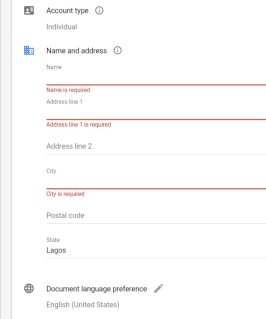
Assuming you want to verify your UK, USA and China Adsense in Nigeria, you should just put the virtual address given to you by shoptomydoor into your Adsense address and your Adsense PIN will be sent to you immediately it is available. So let’s go on.

How To Verify UK, USA And China Adsense Account In Nigeria
  • It is easy and simple. Just go to http://shoptomydoor.com and register an account with them.
  • After successful registration, tap on Enter Address and fill it with your Nigeria house address or any nearby post office.
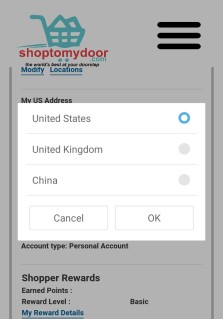
  • Then, under Select Warehouse Location; CHINA, UK And USA you should choose your Adsense Account country.
Adsense
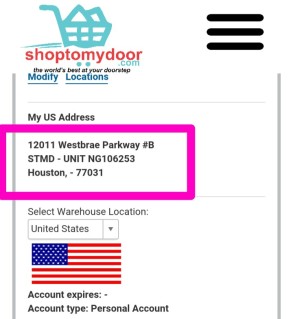
  • After that, an address would be generated for you e.g 12011 Westbrae Parkway #B STMD – UNIT NG106253 Houston, – 77031.
shoptomydoor
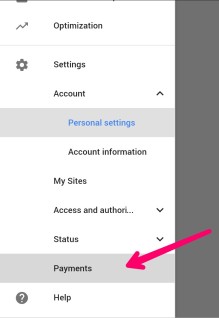
  • Now, login your Adsense account and go to MENU then tap on SETTINGS follow by PAYMENT.
Adsense
  • Insert your Shoptomydoor earlier generated address as your Adsense address and Save.
Adsense
  • So, when your Adsense PIN is sent from Google to your UK, USA or China address, shoptomydoor will pick it for you and send the PIN digits to you for just 10$ as E-mail or sometimes, they might ship it to your Nigeria address you filled earlier.
So, this is how to verify your United states of America, United kingdom and China Adsense Account. If you want to receive payment from your foreign adsense account, you should apply for payoneer MasterCard and open a PayPal account also. Connect your PayPal with your payoneer account and by using the payoneer MasterCard, you will be able to withdraw your money from the PayPal account in any Nigeria bank.


Is it helpful? Do you encounter any problems or issues while trying to verify your UK, USA and China Adsense Account? Kindly ask more questions and if it works for you, kindly share your experience!
Read More
  • Share This:  
  •  Facebook
  •  Twitter
  •  Google+
  •  Stumble
  •  Digg

Tuesday, 25 April 2017

Two Methods to Update Infinix Zero 4 to Official Android 7.0 Nougat

 Abdul     April 25, 2017     android, How To     No comments   

Two Methods to Update Infinix Zero 4 to Official Android 7.0 Nougat

Hello guys, recall InfinixMobility earlier released the official list of Infinix Smartphones that will receive Android Nougat 7.0 Update and subsequently rolled it out to the Infinix Note 3, well that
same update is now being pushed to the Infinix Zero 4 in batches.
This update will reinforce the following:
  1. Optimized the interaction of fingerprint sensor to improve user experience
  2. Optimized the visual sense and interaction of Magazine lockscreen interface
  3. Optimized the interface display of brand new Music 2.0
  4. Optimized the file sending status display of Xshare to improve the fluency of interface sliding
  5. Optimized the multiple spots login experience of XAccount
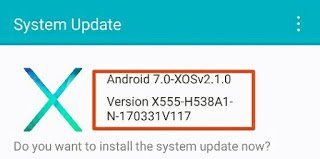
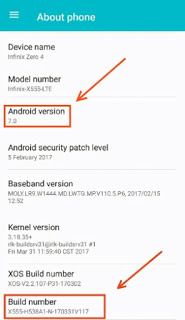
Android 7.0 Nougat update for the Infinix Zero 4 has build number X55-H538A1-N-170331V117 and quite an enormous size.
In this tutorial, we will discuss the two possible methods and you can choose anyone you preferred to update your Infinix Zero 4 to the latest version Android 7.0 Nougat. The first method is OTA (over-the-air) and the second method is T-Card (putting the raw files on SD card).
Important Notice
If you have already rooted your  Infinix Zero 4, to be on a safer side, you’re strongly advised to Unroot. Upgrading an already rooted device Over-the-Air can get the device bricked.
Also, Make sure your device is at least 80% charged before proceeding. Ensure you have enough data bundle or download over unlimited Wi-Fi.
Never forget to back up your files, contact and essential apps before you begin, because the flashing process will re-brand your smartphone and thus clear all your important data and files.
How to Update Infinix Zero 4 to Android 7.0 Nougat Via OTA (over-the-air)
Once the above requirements are met, go ahead with the below procedures.
  • Go to your phone “settings”
  • Scroll down to “about phone”
  • Click on it and tap “system update”
  • You should see the new update, then tap on it to download
Relax and wait for the new update to fully install. After successful installation, your phone will be rebooted and Android 7.0 Nougat will smile to you on the device! Take note that the first booting process might take a few minutes to complete.
NB: After updating, if you encounter any boot loops, simply clear the system cache by entering the quick boot menu and the issue will be solved.
How to Update Infinix Zero 4 to Android 7.0 Nougat Via T-Card
If you don’t have a good network to update your device via OTA or if you followed the above steps, and you cannot get the update Notification, simply update your phone via T-Card with the instruction below.
Kudos to Muhammad Waqar, he is the one made this zipped file available for everyone.
1. Download the files needed from==> this link
2. Download all the files into a single folder for your convenience
3. Unzip the zip file (system.new.zip) that you have downloaded into the same folder
4. Delete the zip file (but keep the unzip file). Step 3,4, and 5 are extremely important
5. Zip all of the files in the folder to a new zip folder.
6. Copy the zip folder into your SD card
7. Go to Settings …. About Phone ……. System Update …. Update from local
8. Select the zip file that you just copied to the SD card. Wait for the update to complete. Congrats your phone is now upgraded
If you encounter any boot loops Just clear the system cache by entering the quick boot menu.
Is It helpful?
Read More
  • Share This:  
  •  Facebook
  •  Twitter
  •  Google+
  •  Stumble
  •  Digg

Friday, 21 April 2017

Reasons Why Your Smartphone Overheats And How To Fix It

 Abdul     April 21, 2017     How To, phone     No comments   

Reasons Why Your Smartphone Overheats And How To Fix It

Someone asked me sometime ago why his smartphone overheats constantly even to the extent of making it uncomfortable to hold on the palms, this is not the first time some persons are getting worried.

About this issue and after stumbling on similar topic online this morning, I think it’s time to reveal the major causes of this overheating problem and solutions to fix them.

Reasons Why Smart Phone Overheats and Solution  - AbdulTech
Sometimes, we notice our phones gets hotter than usual and the funny part is most smartphone users are acquainted to it and now see it as a norm for a phone to be very hot while in use. Don’t get it twisted, on a normal circumstance, a smartphone should be hot while in use but it shouldn’t be too hot to the extent of making the user uncomfortable. So without wasting much time, let’s see the causes and solutions to smartphone overheating problems.

REASONS WHY SMARTPHONE OVERHEATS AND SOLUTIONS

1. Battery Problems

One of the major reasons why smartphones heat up is from the battery; some phones uses fake batteries and this is detrimental and can even result to explosion as we saw on the Samsung Galaxy Note 7 last year. For the solution, you can check the battery status by dialing *#*#4636#*#* for information on your phone. If you see anything other than “good” in the section labeled “Battery Status”, you might need to change your battery.
Also, some smartphones normally heat up while charging especially phones that supports fast charging and using the phone during charging. To fix this, don’t use your phone while charging and if it’s getting too hot, turn off “fast charging mode” (if the option is available on your phone)

2. Faulty and Fake Chargers

Your charger could be the cause of your phone getting overheated during charging, if your phone gets too hot at the port area while charging, my dear, the charger is faulty. For the solution, try replacing the USB chord but if the overheating persists, replace the charger entirely with an original company specified charger.

3. Heavy Apps/Games

Show me a hard-core gamer and I will tell you how his or her phone gets hot😀. The truth is some apps and games use up a lot of processing power while you use them. If you use these apps over a long period of time, your smartphone will overheat. If it happens only when you use these apps, then don’t worry. You just need to close the app and let the device rest for a while.

4. Virus and Infected Apps

Have you ever installed an app and after that, you start seeing different annoying ads popups? You are not alone because it happens to many smartphone users. Some of the apps that behaves like that are actually infected apps, while some are dangerous viruses and Malware that can even damage your phone. Some phone apps are just badly designed. If you install an app and shortly after, your smartphone begins to overheat, there is a possibility that app is responsible for it. The solution is to quickly uninstall the app. You can also check out this Antivirus app to clean your phone of malicious attacks from playstore.

5. Factory Fault

Some overheating is due to a factory fault in the device. A good example is the case of Samsung Galaxy Note 7 which was overheating and exploding last year after it was launched but was later recalled by the South Korean company. Meanwhile, if you just bought your phone and noticed it gets too hot, kindly go to the vendor or manufacturer and replace it. You can also take the smartphone to an authorized service center to have it fixed

6. Overusing

It’s true that smartphone is fun to use, no one want to miss out on the latest happenings online and we always play games and watch videos with our phone but this activities makes the phone heat up. I mean, phones needs rest or don’t you think it gets angry when you don’t give it the rest it deserves? So in a bombshell, if your phone gets too hot while in use, just drop it for some minutes or few hours.

7. Hot Environment

Also, avoid leaving your smartphone in hot conditions e.g. on car dashboards or near ovens. I personally noticed this whenever I travel a long distance as my phones seems to get hotter than when I’m at home. Also when the weather is hot, the phone responds by getting hot as well. So the best solution is to use the phone in a cool or not-so-hot environment. Avoid dropping the phone on car dashboard or similar places.
Yes guys, those are the main reasons, causes and fixes for smartphones that overheats. I hope you find this article interesting so please kindly help me SHARE this post on Facebook, WhatsApp, Twitter etc by hitting the share buttons below. Don’t forget to drop a comment if you have experienced any of the overheating issues on your phone. 
                                                                                                                                  Thank you.
Read More
  • Share This:  
  •  Facebook
  •  Twitter
  •  Google+
  •  Stumble
  •  Digg

Saturday, 15 April 2017

How To Get Free Airtime To Subscribe And Call Using Raadaa

 Abdul     April 15, 2017     How To, phone     1 comment   

In this current economic situation of Nigeria and other countries, everyone must make money to pay the tax of their subscription fees for the internet because almost everything is now made of Technology and is advancing everyday with high consumption of internet data. So, AbdulTech provides browsing solutions to solve or reduce the way people purchase data for Internet purposes and that’s why you have to always stay updated.
There is now a mobile site called Raadaa that the main purpose is to share and monetize contents for individuals, organizations and authors including newspapers, articles, research papers, blogs and many other things. So if you are an author, you can always share your content and earn revenue in this platform by sharing your contents for people to read for free.
However, any user can make free 50naira on users they bring to the website or any user that registered though their referrals link. It is easy and simple to REDEEM your money as a recharge card.
Features And Benefits Of Raadaa
  • The earned money will always be paid to your network as a recharge card.
  • It can be used to make calls and call friends with families.
  • The recharged money can be used for subscription of data plans.
  • It is a normal credit.
  • It is easy and simple to handle.
How To Join Raadaa To Make Money For Subscription Of Data And Others
  • Firstly, visit Raadaa by Clicking here.
  • Then sign up and a verification mail will be sent to your email, just go to your email and tap on the link to verify.
  • After that, login your Raadaa account and Tap on BECOME AN AGENT to open where you will get your referrals link.
  • So, copy the referrals link and share to friends and families on social  medias to earn money.

raadaa
Note: One person referred gives you Free 50naira. So keep sharing till you get more than that.
Is it helpful? Do you encounter any issues or problems while trying to set this up, kindly ask more questions and if it works for you, kindly share your experience!
Read More
  • Share This:  
  •  Facebook
  •  Twitter
  •  Google+
  •  Stumble
  •  Digg

Friday, 14 April 2017

How To Change your profile on Blogger

 Abdul     April 14, 2017     blogging, How To, Web tutorials     No comments   

You can share info about yourself with your readers with your Blogger or Google+ profile.
blogger

Choose your profile

You can use your Google+ profile or create a Blogger-specific profile:
  1. Sign in to Blogger.
  2. In the left menu, click Settings and then User settings.
  3. Under “General,” next to “User Profile,” choose a profile type:
    • Blogger
    • Google+
  4. In the top right, click Save settings.
Note: You can only use one profile for all blogs you contribute to.

Use a Blogger-specific profile

  1. Sign in to Blogger.
  2. In the left menu, click Settings and then User settings.
  3. Under “General,” next to “User Profile,” choose “Blogger.”
  4. In the top right, click Save settings.

Edit your Blogger profile

  1. Sign in to Blogger.
  2. In the left menu, click Settings and then User settings.
  3. Under “General,” next to “User Profile” and under “Blogger,” click Edit.
  4. Make your changes.
  5. Click Save Profile.

Show your profile on your blog

  1. Sign in to Blogger.
  2. In the top left, next to the name of your blog, click the Down arrow Down Arrow.
  3. Choose the blog to update.
  4. In the left menu, click Layout.
  5. Choose where on the page you want to show your profile and click Add a gadget.
  6. Choose a profile gadget:
    • The Google+ Badge gadget will display your Google+ profile.
    • The Profile gadget will show either your Blogger profile or Google+ profile, depending on which profile you’ve selected to contribute to blogs.
  7. Next to the one you want, click Add Add.
  8. Choose your settings.
  9. Click Save.
  10. In the top right, click Save arrangement.
Is it helpful? What do you think?
Read More
  • Share This:  
  •  Facebook
  •  Twitter
  •  Google+
  •  Stumble
  •  Digg

Saturday, 1 April 2017

New Way To Earn Free Airtime Using An App Called GeoPoll

 Abdul     April 01, 2017     apps, How To     1 comment   

You can now get and earn free airtime on GeoPoll App. GeoPoll is a mobile surveying app platform transforming the way data are collected and
received. It is very easy and simple to earn through this app by just allowing the app to conduct a survey with you. In doing this, you will be able to share your voice and opinions with the world even their partners includes organizations, businesses worldwide and non-profit.
How GeoPoll Works
Yea! You will always earn money when you complete the survey task. GeoPoll will always send you a survey to complete but your information is safe and collected anonymously and they also promised never to share your personal identifiable information. The questions they ask are very simple with options to answer and sometimes, you input answer yourself.
Geopoll
GeoPoll airtime can be used to make calls, transferred to another number and can also be used to subscribe for data. This app generates alot of airtime that’s why you should opt for it.
Advertisement:


How To Join GeoPoll And Start Earning Airtime
  •  Just download the GeoPoll app on playstore 
  •  Then register with your phone number,and tap on User Referral code then use this code 1MYKHB1 as your invitation code from friend to earn more cash.
So, you will be getting survey which when completed, you get free airtime.
How To Redeem Your Airtime

Once your money completes N100, you should tap the REDEEM button and get your airtime automatically recharged into your phone number via VTU. So the networks supported are Etisalat, Glo, Airtel and MTN.
geopoll
You can also share your referrals link to get more airtime credit particularly on WhatsApp, Facebook and other social medias.

Is it helpful? Do you encounter any problems or issues while trying to set this up, kindly ask more questions and if it works for you, kindly share your experience!


Read More
  • Share This:  
  •  Facebook
  •  Twitter
  •  Google+
  •  Stumble
  •  Digg

How To Check Who Viewed Your WhatsApp Profile

 Abdul     April 01, 2017     apps, How To     1 comment   

Are you looking on how to check your WhatsApp profile? Its possible! You can check who viewed your WhatsApp profile. It is very simple and easy. Sometimes, you might just want to know the statistics but you can’t check it normally because WhatsApp application doesn’t have the feature yet. So in this tutorial, we will be making use of an app called WhatsTracker.
This app allows you to track those who visited your WhatsApp profile and the visitor’s phone number would be revealed. Not only that, you can also view the visitor’s location on the map.
Advertisement:


How To Track Who Viewed Your WhatsApp Profile
  • Firstly, download What’s Tracker App on your Android Device by clicking here.
  • Then login using your WhatsApp phone number and you will see three options;
CONTACTS: These are the list of your WhatsApp contacts, you stored on your phone.
VISITED: These are the list of your WhatsApp contacts profile, you have visited.
VISITORS: These are the list of people who viewed your WhatsApp profile.
whats tracker


  • You can also use location tracker to view those who visited or those on your WhatsApp contacts but is a premium feature.
    whats tracker

    • Must Read: How To hack Android Games Using Lucky Patcher Without Root
    However, this Whats Tracker app works on android running on 4.0+ version and above.
     
    Is it helpful? Do you encounter any problems or issues while trying to set this up, kindly ask more questions and if it works for you, kindly share your experience!


    Read More
    • Share This:  
    •  Facebook
    •  Twitter
    •  Google+
    •  Stumble
    •  Digg

    Saturday, 25 March 2017

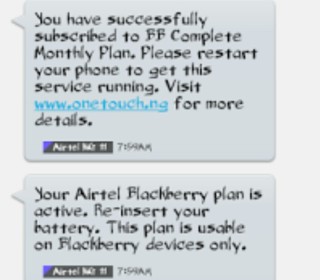
    How To Activate BB Plan Of 3GB For 1,000Naira On Android Device

     Abdul     March 25, 2017     airtel, How To     10 comments   

    Airtel has joined the best network that offers cheaper data plans even on BlackBerry phone because it refused to join other networks like Etisalat and MTN in offering BlackBerry services. Though, many people still use BB smartphones and services regardless of the total collapse of the OS and services.
    blackberry data plan

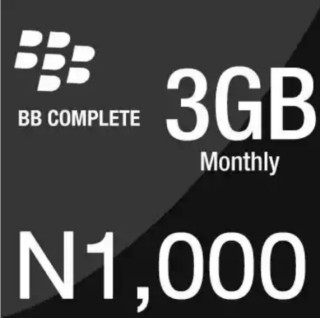
    if you are using Airtel network, you will still have access to BB services. Recently, Airtel re-launched the 1,000naira for 3GB data for only BlackBerry users but with this tutorial, you would be able to make use of the data on your PC, game console, watch online videos, watch live matches, play online games and many others. Let’s see how to configure it in order to be usable on Android and to power all Apps.

    How To Activate And Use Airtel 3GB For 1,000naira On Android Device


    • Firstly, download MTK engineer app by clicking here and Tweak or change your IMEI to this BB10 IMEI; 356760051192*** (add three more digits to it by analyzing to complete 15digits) and Tweak the IMEI.
    • After successful tweaking, dial *431# to activate the 3GB for 1,000naira which lasts for complete month (30days).
    • So you can now check your data balance by dialling *140#.
      data

    I hope you can see how it is easy and simple.


    Is it helpful? Do you encounter any problems or issues while trying to activate this? Kindly ask more questions and if it works for you, kindly share your experience!
    Read More
    • Share This:  
    •  Facebook
    •  Twitter
    •  Google+
    •  Stumble
    •  Digg
    Older Posts Home

    Popular Posts

    • Upgrade Your Tecno Y4 To 6.0 Marshmallow Using Mystic OS V7 Custom ROM
      Do you know that you can upgrade your  Tecno Y4  to 6.0 Marshmallow? Yea! You can do that easily with this tutorial and by installing  Mysti...
    • How To Activate BB Plan Of 3GB For 1,000Naira On Android Device
      Airtel has joined the best network that offers cheaper data plans even on BlackBerry phone because it refused to join other networks like Et...
    • FIFA 14 v1.3.6 Mod Apk + Obb Data [No Root] Download, Install And Play [Fully Unlock]
      EA Sport Android FIFA 14 has been the best Android football HD game so far due to its HD graphics, realness, offline feature to enjoy manage...
    • OnePlus 5T ‘Star Wars Edition’ Has Been Launched In India
      A month after the dispatch of the OnePlus 5T , OnePlus indeed took the middle stage to report the dispatch of the new Star Wars-enlivened...
    • How To Transfer Credit Or Airtime On Etisalat, MTN, Glo And Airtel Network
      Are you looking for a way to transfer credit or Airtime on  Glo, Etisalat, MTN  and  Airtel  networks? Yea! You can do that with just an eas...

    Categories

    airtel android apple apps blogging Browsing cheats computer etisalat games glo google pixel Hacks How To infinix internet internet & data internet data ios mod mtn network oneplus oneplus 5t oneplus5t star wars oreo pc phone premium accounts Ram Roms samsung star wars tecno telegram tweakware wallpapers Web tutorials whatsapp

    Newsletter

    Subscribe Our Newsletter

    Enter your email address below to subscribe to our AbdulTech newsletter.

    About Us

    AbdulTech

    Vanice is modern magazine blogger template which focuses on lifestyle news, health, and entertainment.

    Pages

    • Home
    • About Us
    • Disclaimer
    • Sponsor A Post
    • Contact Us
    • Write For Us
    • Advertise With US

    Blog Archive

    • ▼  2019 (1)
      • ▼  January (1)
        • Download Brawl Stars APK Latest December Update
    • ►  2018 (12)
      • ►  December (1)
      • ►  October (4)
      • ►  August (3)
      • ►  June (1)
      • ►  April (3)
    • ►  2017 (173)
      • ►  December (3)
      • ►  August (3)
      • ►  July (8)
      • ►  June (6)
      • ►  May (7)
      • ►  April (40)
      • ►  March (49)
      • ►  February (57)

    Copyright © AbdulTech | Powered by Blogger
    Design by Hardeep Asrani | Blogger Theme by NewBloggerThemes.com | Distributed By Gooyaabi Templates